What is user story mapping
User story mapping is a workshop technique that creates a visual representation of product requirements, and orders them based on priority, user theme & time.
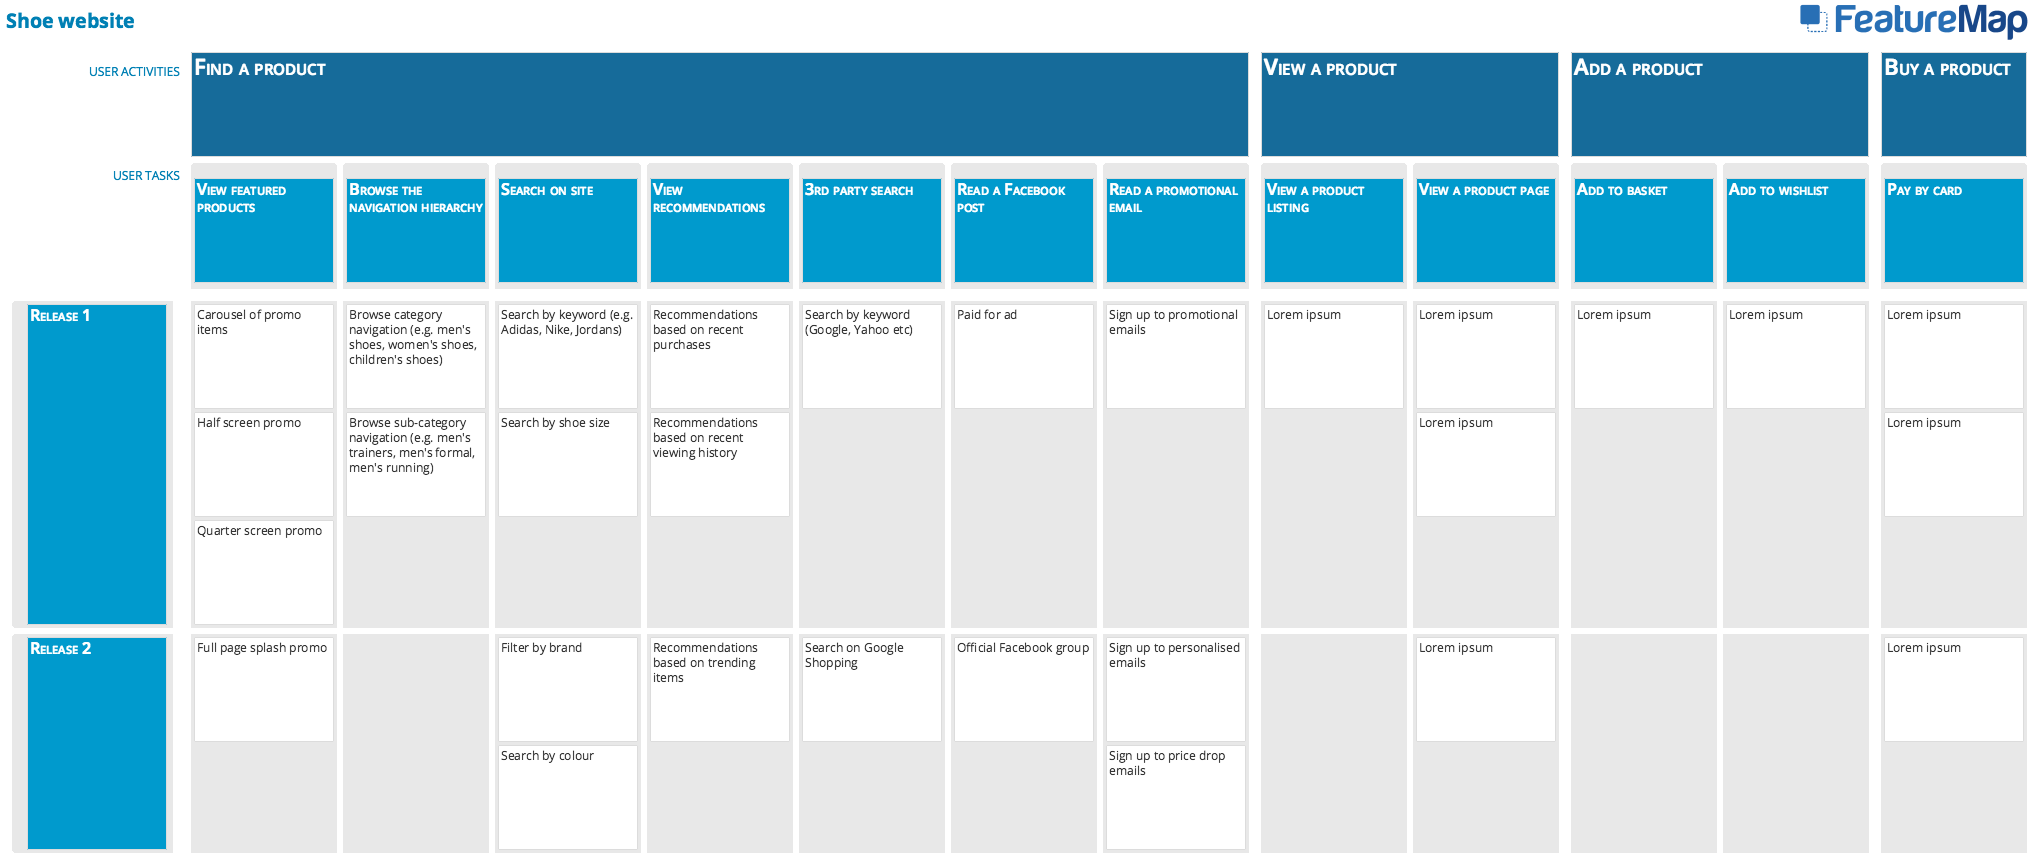
The output of user story mapping is a product roadmap that clearly conveys the context of each user story, the horizontal slices of the MVP, and the aspirational scope of the product.
The technique has become popular through the work of Jeff Patton. An example user story map is here:
Reasons to use this technique
The early stages of the new product lifecycle can be a challenging time for Business Analysts. Considerable BA effort can be spent:
- Capturing initial requirements (e.g. User Stories) & creating a structure around them (e.g. EPICs)
- Capturing the overall product scope for the new product
- Prioritising requirements into an MVP and subsequent releases
- Understanding where to focus the analysis effort (i.e. which areas to initial spec out)
User story mapping will help you visualise the requirements & their context within the overall product roadmap. You will create a visual overview of the roadmap.
How to run a USM session
Organise a workshop with the key stakeholders: product, UX, technology, internal SMEs etc. Ideally you want no more than 10 people (7 + – 2 is the magic number).
Bring post-it notes, pens and plenty of sweets.
Step 1 (kickoff & context)
The BA/PO kicks off the session. They present a summary of the product vision. What problems does the product need to solve? What audience insight do we have? What are our known constraints? What are our competitors doing? What are our aspirations?
An example would be “We want to build a website that sell shoes to teenagers. We have evidence that XYZ opportunity exists and we want to focus on the teenage market etc etc”
This should take 10 – 20 minutes.
Step 2 (identify user tasks)
Each stakeholder should (in silence) write down how a user will use this new product on post-it notes. What do users they need & want to be able to do?
An example would be: “search for shoes”, “browse a website hierarchy”, “view recommended products” “add to a basket” “share on Facebook” etc.
As a tip to ensure you’re capturing the correct detail – they should be written from the user’s perspective and usually start with a verb (e.g. add, share, browse, buy etc). These are the things your users will do with the product.
This should take 10 minutes (depending on the scope of the product).
Step 3 (remove duplicate tasks)
The BA/PO should put the post-it notes on a physical board. Talking about each post-it note, the author should describe what they’ve written and why.
During this process duplicate post-it notes should be removed.
You will end up with something like this:

These are your USER TASKS (i.e. things a user does to achieve an objective). They form the walking skeleton.
This should take 15 minutes.
Step 4 (identify user activities)
With the post-it notes on the board, start to organise them into clusters (clusters = based on similarity). Assign each cluster a name.
An example would be: “find a product“, “view a product“, “buy a product“ etc. Where “find a product“ includes “search on site”, “browse a website hierarchy”, “view recommended products” etc.
Order these clusters according to the order in which a user would complete them.
For example: find a product > then view a product > then add a product > then buy a product
Note – if the post-it notes can’t be ordered from a user perspective, then you can order them based on when you plan to pick up the work. Ideally you should organise the items from the user’s perspective, so that reading the activities from left to right tells a story and represents a narrative.

These clusters are your USER ACTIVITIES. They form the backbone.
This should take 15 minutes.
Step 5 (confirm all activities & tasks are captured)
With the USER ACTIVITIES and USER TASKS on the board – explore the user journey and see whether you have captured all the activities and tasks. Thinking in terms of user personas can assist. Drill down into the activities to see if there’s additional detail you can add.
Use this as a time to confirm that you’ve captured the scope of the system. If there are activities or tasks that don’t fit into the main narrative (e.g. user can localise the website language), add these items to the end of the map.
This should take 20 minutes.
Step 6 (identify user stories)
The final level of detail for the map is USER STORIES. I haven’t encountered a body related synonym for user stories – continuing with the theme of walking skeleton & backbone, we could suggest body of work?
Each USER TASK will have user stories. Explore the user tasks in additional detail – capture and frame that detail as user stories (each user story requires a title, a description, and any relevant detail).
For example within the “search on site“ user task, there could be a user story to:
- Search based on keyword (AS A user, I WANT to search for shoes using keywords such as Nike, Jordan, trainers SO THAT I can find my desired product quickly)
- Search based on colour
- Filter by brand
- Search based on shoe size
The user stories are designed to be a placeholder for a conversation – a snapshot of what the user needs and why. Don’t try to add too much detail. They should meet the INVEST criteria.
This step can take some time, depending on the product. Either take a break until starting the step, or run it as separate sessions.
Step 7 (prioritise user stories)
With the product team steering this, work as a team to put user stories in a priority order, from highest priority to lowest priority. This can be a difficult task – compare the relative value of each user story to another.
Now draw a vertical line to slice to roadmap. This line represents the minimum viable product (MVP), you can draw lines for additional versions of the product too.

Step 8 (next steps)
You should now have all the user stories defined, prioritized and organized by theme.
The BA can take away each user story and work on them separately, adding acceptance criteria/detail in order to allocate them into a Sprint. The great thing about this technique is that each user story now sits within the context of a user journey.

Benefits of user story mapping
+ It visualises the product backlog – a USM is easy to present & understand compared to a list of JIRA tickets. A picture is worth a thousand JIRA tickets 🙂 You can put it on a Sprint board.
+ It radiates information including: the context of items, the relative priority of each item, the groupings of work and the MVP.
+ It’s hierarchical – it covers the high level themes and the more granular user stories. You can see the big picture, the finer detail and the aspirational vision.
+ It encourages valuable slicing of functionality – the lines drawn from left to right slice the backlog so that you don’t build all of the search stories and then run out of money before you develop the buy stories.
+ It organizes the roadmap based on how users will use the new product. By focusing on user behaviour rather than how systems interact, you build a product around the user needs.
FAQs
- Can this be applied to any type of product?
- I think so. Provided it has end users. I’ve applied the technique to a feature which allowed users to sync their favourite items. On the surface of it, the feature was essentially a read/write capability – but we were able to convey it as a set of user tasks.
- Would you ever create multiple user story maps for one product?
- I have never done this. If your product is the Amazon website then you may need multiple maps – but hopefully your product isn’t that large.
- Are there any downsides?
- The user story map doesn’t replace your requirements/JIRA tickets. It’s essentially a way to visualise them within the context of the roadmap. As the system changes you’ll need to update the USM as well as your requirements/JIRA. As such, it’s a product artefact that needs maintaining.
- What if you have no idea what the product is?
- The technique generally assumes there is a product vision around which to hang these tasks/stories. If you have very little idea about the new product (e.g. “we want to build a page on the website where users can see things that most interest them”) then you can still use this technique. I’d recommend some form of upfront thought about what you want that page to do by the product team & a warm up activity for the group before step 2 (e.g. crazy 8’s).
- Aren’t user tasks just another type of user story?
- User tasks can be thought of as high-level user stories e.g. “searching for a product“ is a task that can include multiple user stories (search by keyword, search by shoe size, filter by brand, search by colour). The essence of activities vs tasks vs stories is that they’re hierarchical user needs. Exactly what they are depends on what product you build.

Hey Ryan, nice post. Your benefits section really hits the nail on the head. I think people often don’t realise the power of the hierarchy that USM gives you.
Have you used any digital tools for story mapping? Can I recommend our tool, Avion? https://www.avion.io. It’s a collaborative user story mapping tool for agile teams.
It integrates tightly with backlog tools like Trello, Azure DevOps and Jira, which as you mention, is still a very needed part of the workflow!
Would love any feedback you have on the tool.
Cheers,
James